I love Christmas, I love spending time with my family and the giving spirit. Being a mother of 4, I'm used to being the one giving, but this year I received a very special gift.
Community Service is very important to me, I like to help out whenever I can. I've donated blood regularly since I found out my blood was a rare type when I was 16. But then I became anemic and wasn't allowed to anymore. So when I saw the sign for the Bone Marrow Registry a few months back, I thought that could be a good replacement!
The Bone Marrow Registry is just that - a list of people to search through when someone needs a bone marrow transplant. To get on the registry, it's a simple Qtip swab in your cheek. It's painless and it takes less than 1 minute. Then if you're a match for someone, you'll be contacted.
So I grabbed my form, planning to go the next day and join the registry. Well I was disqualified on the first question. I was upset and my husband Karl was so good listening to my ranting. I didn't really expect he understood how I felt, it took years of me bugging him to just get him to be an organ donor (that's a no brainer I thought).
So now it's been a few months since my bone marrow was rejected. Yesterday, I went yo get the mail and there was a letter for the Registry. I opened it up to find....
KARL'S new membership card!
It turns out the day of the drive, Karl went down and signed up to be a donor to take my place. I couldn't believe it. I have never in my life received a meaningful, thoughtful, and just wonderful gift. I am so blessed to have my family, and I'm wishing all of you the same blessings this holiday!
If you're also interested in joining the Bone Marrow Registry, you can find all of the information right here:
http://marrow.org/
"10,000 patients need a marrow transplant. Only half receive one. Half is not enough."
Wednesday, December 21, 2011
Monday, December 12, 2011
My Daughter the Photographer

My daughters dream is to be a photographer for National Geographic. She is 7 years old, and it seems everything she touches turns out amazing. This is no exception! After she finished the first 4 countries in her Wildlife Photographer learning book, we took her to the zoo on a special trip just for photos. These photos were taken by Molly, age 7 and cropped by me. They have not been edited at all except to crop them!
(here's a link to view her book: http://cabbingrough.blogspot.com/2011/05/mollys-summer-project.html )


Friday, December 9, 2011
How to use your lightbox
Now that you have your lightbox, you need some lights! You do not have to buy $100 lamps!
First, check the Michaels clearance aisle, I bought my $100 lamp there for $12!
Also Hobby Lobby has theirs 50% off a lot.
If you're not that lucky, or they're still too expensive, just buy a natural bulb and use it in any lamp you already have. Natural light bulbs can be found at any hardware store for just a few dollars.
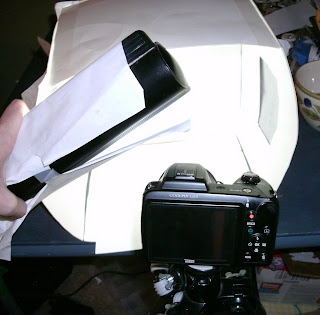
Now to use you light. You can set up 2 lamps, one on either side and shine them through your tissue paper holes.
Or you can do like I do. I taped a piece of typing paper over my light (to get soft light instead of hard shadows) and I point it directly back so the light bounces off the back wall.
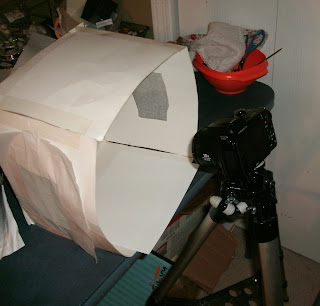
All of this is great, but YOU MUST HAVE A TRIPOD!!! Nobody is steady enough to take a good picture without one. I didn't believe this, but it is true: a tripod is more important than a light box for a good photo. I ordered one of those flexible tripods of ebay. It was total garbage. So I disasembled it, then I disasembled my husband's telescope and stole the tripod part. It works!!
Now you have your lightbox, your lights and your tripod, there are 2 camera settings that are super important.
1.) Macro, the little flower. If you're photographing something small, use it!
2.) the exposure +/- button. This button controls how much light your camera sees. If you turn it up, your photos will be brighter. Start at 0.0 and turn it up by one each photo. I usually have mine set on +1.0 or +1.3.
And my last tip is for jewelry photos. I made this out of black cardstock:
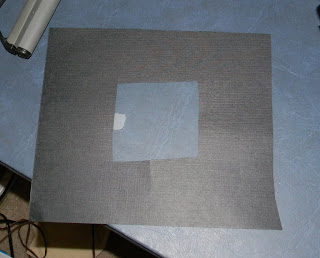
If you slide it into one side of your lightbox, it will give your crystals an extra sparkle! I don't usually use this, but I have tried it and it works well!
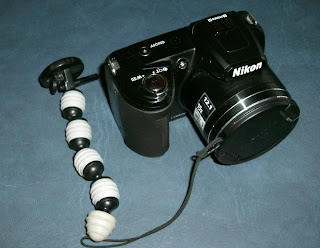
For anyone that's interested, my camera is a Nikon L110. They run a little over $200. It is still a point and shoot, but it looks more like a SLR. EVERYTHING is automatic on this camera, so it's pretty hard to take a bad photo. I really like it a lot. Before this camera, I used a Sony Cybershot I purchased for $79. That was a great camera, too. Both are really great for the cost.
First, check the Michaels clearance aisle, I bought my $100 lamp there for $12!
Also Hobby Lobby has theirs 50% off a lot.
If you're not that lucky, or they're still too expensive, just buy a natural bulb and use it in any lamp you already have. Natural light bulbs can be found at any hardware store for just a few dollars.
Now to use you light. You can set up 2 lamps, one on either side and shine them through your tissue paper holes.

Or you can do like I do. I taped a piece of typing paper over my light (to get soft light instead of hard shadows) and I point it directly back so the light bounces off the back wall.

All of this is great, but YOU MUST HAVE A TRIPOD!!! Nobody is steady enough to take a good picture without one. I didn't believe this, but it is true: a tripod is more important than a light box for a good photo. I ordered one of those flexible tripods of ebay. It was total garbage. So I disasembled it, then I disasembled my husband's telescope and stole the tripod part. It works!!


Now you have your lightbox, your lights and your tripod, there are 2 camera settings that are super important.
1.) Macro, the little flower. If you're photographing something small, use it!
2.) the exposure +/- button. This button controls how much light your camera sees. If you turn it up, your photos will be brighter. Start at 0.0 and turn it up by one each photo. I usually have mine set on +1.0 or +1.3.

And my last tip is for jewelry photos. I made this out of black cardstock:

If you slide it into one side of your lightbox, it will give your crystals an extra sparkle! I don't usually use this, but I have tried it and it works well!

For anyone that's interested, my camera is a Nikon L110. They run a little over $200. It is still a point and shoot, but it looks more like a SLR. EVERYTHING is automatic on this camera, so it's pretty hard to take a bad photo. I really like it a lot. Before this camera, I used a Sony Cybershot I purchased for $79. That was a great camera, too. Both are really great for the cost.
How to make a lightbox
Start with a big white posterboard - you can get one at Walmart for $.59.
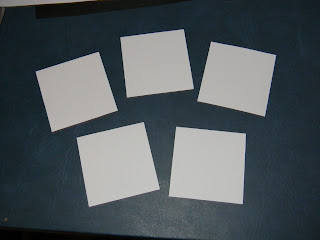
Cut out 5 squares, 10-12" is a good size.
Tape three squares together, scotch tape is fine. The tape will work as hinges, so don't overlap the squares.
Tape the top square on.

Tape the bottom square on. Now you have a white cube!
Cut holes in each side. The light will come in from here, so you want them to be good sized.
Tape tissue paper over the holes, this will soften your light so you don't get big ugly shadows.

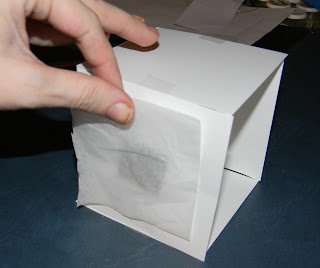
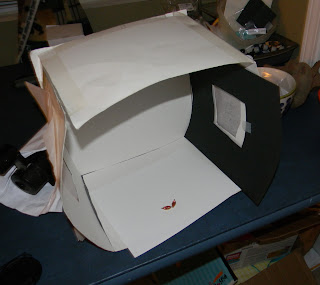
Here's my light box, you can tell it's well loved!!
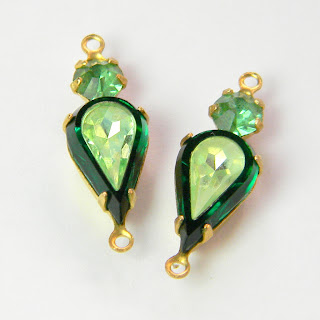
And here is a photo taken with my lightbox:
See the next article for using your lightbox!
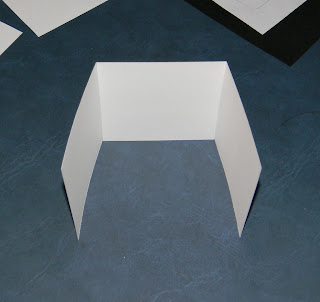
Cut out 5 squares, 10-12" is a good size.

Tape three squares together, scotch tape is fine. The tape will work as hinges, so don't overlap the squares.

Tape the top square on.

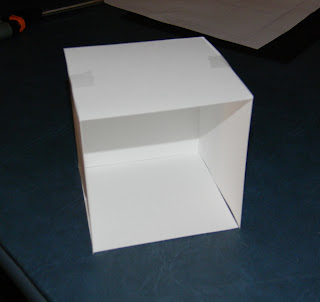
Tape the bottom square on. Now you have a white cube!

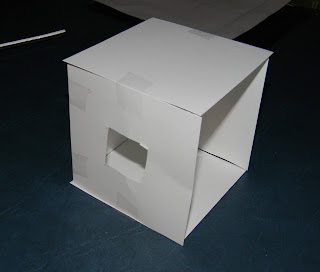
Cut holes in each side. The light will come in from here, so you want them to be good sized.

Tape tissue paper over the holes, this will soften your light so you don't get big ugly shadows.

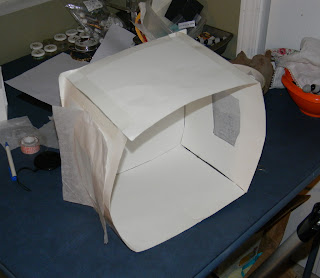
Here's my light box, you can tell it's well loved!!

And here is a photo taken with my lightbox:

See the next article for using your lightbox!
Subscribe to:
Posts (Atom)