I love Christmas, I love spending time with my family and the giving spirit. Being a mother of 4, I'm used to being the one giving, but this year I received a very special gift.
Community Service is very important to me, I like to help out whenever I can. I've donated blood regularly since I found out my blood was a rare type when I was 16. But then I became anemic and wasn't allowed to anymore. So when I saw the sign for the Bone Marrow Registry a few months back, I thought that could be a good replacement!
The Bone Marrow Registry is just that - a list of people to search through when someone needs a bone marrow transplant. To get on the registry, it's a simple Qtip swab in your cheek. It's painless and it takes less than 1 minute. Then if you're a match for someone, you'll be contacted.
So I grabbed my form, planning to go the next day and join the registry. Well I was disqualified on the first question. I was upset and my husband Karl was so good listening to my ranting. I didn't really expect he understood how I felt, it took years of me bugging him to just get him to be an organ donor (that's a no brainer I thought).
So now it's been a few months since my bone marrow was rejected. Yesterday, I went yo get the mail and there was a letter for the Registry. I opened it up to find....
KARL'S new membership card!
It turns out the day of the drive, Karl went down and signed up to be a donor to take my place. I couldn't believe it. I have never in my life received a meaningful, thoughtful, and just wonderful gift. I am so blessed to have my family, and I'm wishing all of you the same blessings this holiday!
If you're also interested in joining the Bone Marrow Registry, you can find all of the information right here:
http://marrow.org/
"10,000 patients need a marrow transplant. Only half receive one. Half is not enough."
Wednesday, December 21, 2011
Monday, December 12, 2011
My Daughter the Photographer

My daughters dream is to be a photographer for National Geographic. She is 7 years old, and it seems everything she touches turns out amazing. This is no exception! After she finished the first 4 countries in her Wildlife Photographer learning book, we took her to the zoo on a special trip just for photos. These photos were taken by Molly, age 7 and cropped by me. They have not been edited at all except to crop them!
(here's a link to view her book: http://cabbingrough.blogspot.com/2011/05/mollys-summer-project.html )


Friday, December 9, 2011
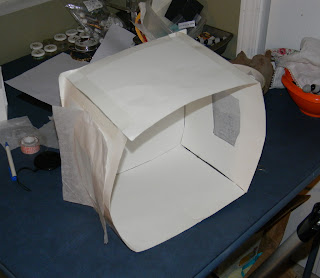
How to use your lightbox
Now that you have your lightbox, you need some lights! You do not have to buy $100 lamps!
First, check the Michaels clearance aisle, I bought my $100 lamp there for $12!
Also Hobby Lobby has theirs 50% off a lot.
If you're not that lucky, or they're still too expensive, just buy a natural bulb and use it in any lamp you already have. Natural light bulbs can be found at any hardware store for just a few dollars.
Now to use you light. You can set up 2 lamps, one on either side and shine them through your tissue paper holes.
Or you can do like I do. I taped a piece of typing paper over my light (to get soft light instead of hard shadows) and I point it directly back so the light bounces off the back wall.
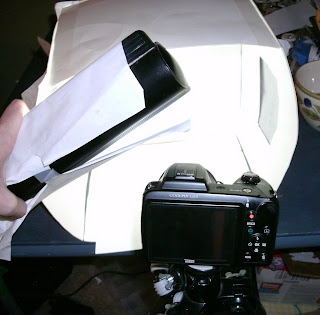
All of this is great, but YOU MUST HAVE A TRIPOD!!! Nobody is steady enough to take a good picture without one. I didn't believe this, but it is true: a tripod is more important than a light box for a good photo. I ordered one of those flexible tripods of ebay. It was total garbage. So I disasembled it, then I disasembled my husband's telescope and stole the tripod part. It works!!
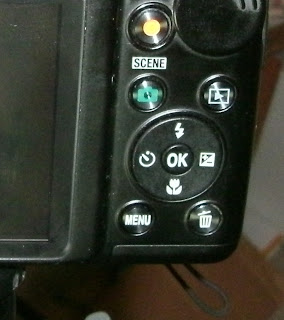
Now you have your lightbox, your lights and your tripod, there are 2 camera settings that are super important.
1.) Macro, the little flower. If you're photographing something small, use it!
2.) the exposure +/- button. This button controls how much light your camera sees. If you turn it up, your photos will be brighter. Start at 0.0 and turn it up by one each photo. I usually have mine set on +1.0 or +1.3.
And my last tip is for jewelry photos. I made this out of black cardstock:
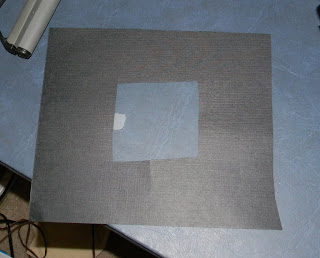
If you slide it into one side of your lightbox, it will give your crystals an extra sparkle! I don't usually use this, but I have tried it and it works well!
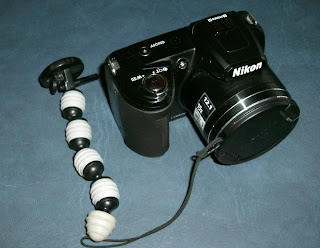
For anyone that's interested, my camera is a Nikon L110. They run a little over $200. It is still a point and shoot, but it looks more like a SLR. EVERYTHING is automatic on this camera, so it's pretty hard to take a bad photo. I really like it a lot. Before this camera, I used a Sony Cybershot I purchased for $79. That was a great camera, too. Both are really great for the cost.
First, check the Michaels clearance aisle, I bought my $100 lamp there for $12!
Also Hobby Lobby has theirs 50% off a lot.
If you're not that lucky, or they're still too expensive, just buy a natural bulb and use it in any lamp you already have. Natural light bulbs can be found at any hardware store for just a few dollars.
Now to use you light. You can set up 2 lamps, one on either side and shine them through your tissue paper holes.

Or you can do like I do. I taped a piece of typing paper over my light (to get soft light instead of hard shadows) and I point it directly back so the light bounces off the back wall.

All of this is great, but YOU MUST HAVE A TRIPOD!!! Nobody is steady enough to take a good picture without one. I didn't believe this, but it is true: a tripod is more important than a light box for a good photo. I ordered one of those flexible tripods of ebay. It was total garbage. So I disasembled it, then I disasembled my husband's telescope and stole the tripod part. It works!!


Now you have your lightbox, your lights and your tripod, there are 2 camera settings that are super important.
1.) Macro, the little flower. If you're photographing something small, use it!
2.) the exposure +/- button. This button controls how much light your camera sees. If you turn it up, your photos will be brighter. Start at 0.0 and turn it up by one each photo. I usually have mine set on +1.0 or +1.3.

And my last tip is for jewelry photos. I made this out of black cardstock:

If you slide it into one side of your lightbox, it will give your crystals an extra sparkle! I don't usually use this, but I have tried it and it works well!

For anyone that's interested, my camera is a Nikon L110. They run a little over $200. It is still a point and shoot, but it looks more like a SLR. EVERYTHING is automatic on this camera, so it's pretty hard to take a bad photo. I really like it a lot. Before this camera, I used a Sony Cybershot I purchased for $79. That was a great camera, too. Both are really great for the cost.
How to make a lightbox
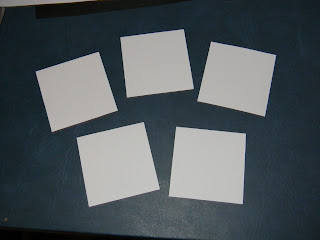
Start with a big white posterboard - you can get one at Walmart for $.59.
Cut out 5 squares, 10-12" is a good size.
Tape three squares together, scotch tape is fine. The tape will work as hinges, so don't overlap the squares.
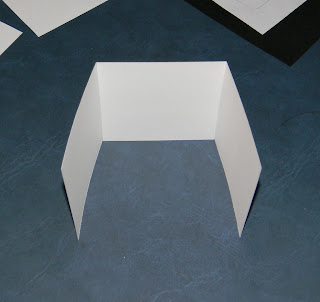
Tape the top square on.

Tape the bottom square on. Now you have a white cube!
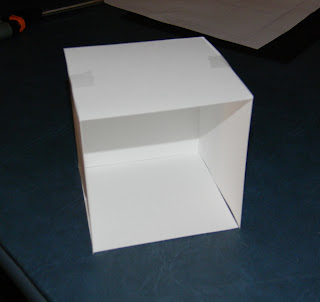
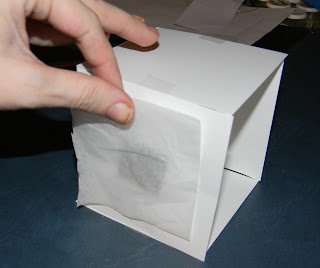
Cut holes in each side. The light will come in from here, so you want them to be good sized.
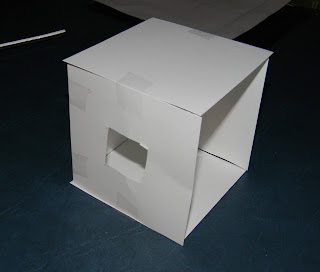
Tape tissue paper over the holes, this will soften your light so you don't get big ugly shadows.

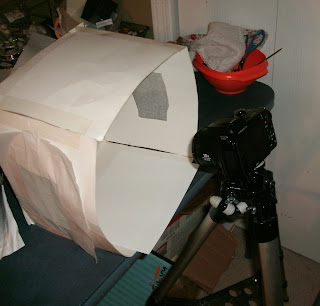
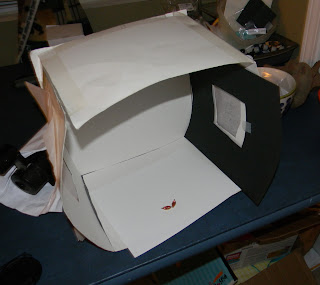
Here's my light box, you can tell it's well loved!!
And here is a photo taken with my lightbox:
See the next article for using your lightbox!
Cut out 5 squares, 10-12" is a good size.

Tape three squares together, scotch tape is fine. The tape will work as hinges, so don't overlap the squares.

Tape the top square on.

Tape the bottom square on. Now you have a white cube!

Cut holes in each side. The light will come in from here, so you want them to be good sized.

Tape tissue paper over the holes, this will soften your light so you don't get big ugly shadows.

Here's my light box, you can tell it's well loved!!

And here is a photo taken with my lightbox:

See the next article for using your lightbox!
Friday, September 23, 2011
What Inspires Me??
This is my very first time participating in the Aspiring Metalsmiths blogroll,and the timing and subject turned out to be perfect. This morning I woke up and had my coffee at my rock table as I do every morning. My rock table is where I keep a large pile of slabs and small pieces to sift through during coffee time.

Usually the rocks themselves are my inspiration. They usually tell me how they want to be cut. But this morning it just wasn't happening.
Just about an hour after I had given up, my wonderful post lady arrived with my new Sonoran Dentridic! I took it to the saw immediately.
When I came upstairs, I had an email waiting for me. One of the incredibly talented artists I work with sent me photos of the new piece she made with my stones! This gorgeous necklace was made with a 3 piece set of porcelain jasper I had cut.

When I went back to look at my Sonoran Dentridic, the 3 piece set jumped right out at me! I can't wait to cab this set.

So even though my inspiration ussally comes from the rocks themselves, today I had a big bosst! To see more of Janna's work, visit her etsy shop at www.heartandwing.etsy.com

Each month the Aspiring Metals team chooses a topic and each write about that topic on their blog. This month we want to know what inspires you, and where do you look for inspiration?
See what we have to say by visiting the blogs below:
Jessica @ Abella Blue - http://www.abellablue.com/blog
Autumn Bradley - http://www.autumnbradley.blogspot.com
Crow Steals Fire - http://crowstealsfire.blogspot.com/
Contemporary Jewelry by Beatriz Fortes - http://cjbf.blogspot.com/
Stacy - http://www.formandfunktionaccessories.blogspot.com/
Cabbing Rough - http://cabbingrough.blogspot.com Brightstar109 - http://brightstar109.blogspot.com/
Silver Pearl Jewelry and Metalworks - http://silverpearlmetalworks.wordpress.com/
City Rustic Jewelry - http://cityrustic-art.blogspot.com/
Becky Campion - http://www.ladysmythmetals.com/blog.html
Julie - http:/wabibrookstudio.com/blog.php
Tuesday, July 26, 2011
Morrisonite

Morrisonite is without a doubt the most beautiful and sought after jasper in the world. This gem grade jasper first began to make it’s way into the hands of rockhounds in the late 1940’s. It didn’t take long for the word to spread of this magnificent new material, and soon rockhounds from all over were traveling to Eastern Oregon in search of Morrisonite.
Morrisonite, also known as Morrison Ranch Jasper, was first discovered in the early 1930’s by James Morrison. Morrison lived in a one room stone house located in an Owyhee river canyon. He made a living off his land and had a passion for Native American artifacts.
It wasn’t until the late 1940’s when James invited friends over who shared his artifact collecting enthusiasm that he showed this new and unusual rock he had found on his property. It was not long after that the first claim was filed.
Over the course of 40 years miners came and went, and there are currently 5 claims. The most famous of these claims are the Amy Ellen, Christine Marie, and Jakes Place claim with the latter of these producing the most material that is on the market today. The Amy Ellen however is famous for having the most exotically colored jasper. The last major production of morrisonite was done by Eugene Miller of The Gem Shop in 1996.
Although referred to as a jasper now, when Morrisonite was first discovered nobody knew exactly what it was. Being called everything from a jasper to a jade, Morrisonite displays a wide variety of colors and patterns. It is unique in the fact that it is not found in other gem grade materials. It has also become very rare and hard to find, so you can imagine how thrilled we were to run across and entire box (22 pounds) of it at an auction! This material is also incredibly hard and takes an amazing hard polish. It has definitely become one of my favorite rocks!
You can see more Morrisonite cabs we have cut here.
Monday, May 30, 2011
Molly's Summer Project

My daughter Molly, who will turn 7 this summer, dreams of being a photographer for National Geographic when she grows up. She loves reading the magazines, both the adult and kids version. For her summer learning project I put together a book that will take her to 7 different countries. This is how it works:
First I made this book for her to keep all of her activities in:

For each country she receives a packet. The packet starts with a letter from her boss welcoming her to whatever country. The first country is Madagascar. The letter explains she has to start by learning about the country so she doesn’t get lost!

First she reads a packet about the country. In the book she will mark important cities/landmarks on the map.

She will color where the country is on the world map.

She can then write interesting and important facts about the country in the fold out book.

After she has learned about the country, she can start on the animals! Each country has a packet of 10 animal information sheets (printed from enchantedlearning.com) She reads about each animal, then makes an animal fact card for each one. She writes about the animal on one side and draws a picture on the other. Tonight she made cards for the Aye-Aye and the Ploughshare Tortoise.

Next she needs to choose 3 animals she thinks should be included in the new National Geographic Zoo. For each of these animals she needs to write why she thinks they should be included in the zoo.

Then she needs to write a letter home telling her family about her trip to this country.

After each country, we will take her to the zoo to get real photographs of the animals she has learned about! There are pages in the back of the book for her photographs.
I gave Molly her book tonight. Her eyes lit up and she started working on her first animal cards right away. At bedtime she begged to stay up and work “just a little bit longer!” I love seeing her so excited to learn!
Tuesday, April 12, 2011
Introducing Some Amazing Artists!

Ring I am currently lusting over, made by formandfunktion
For those of you that don’t know me well, my favorite part of etsy is the shopping! And my biggest weakness? Jewelry of course! Jewelry is a very personal purchase for me, especially since my daughter was born. We spend hours together going through my collection and trying on the different pieces I have collected. But all of my favorites have come off of etsy. The pieces of my collection from etsy have gained a story. Who made it? Where are they from? What inspired this? These are some of things my daughter will ask about my jewelry.
Over the next few weeks, I am excited to be able to introduce my readers to some of the talented artists on etsy that have made their way into my jewelry box, and into my family memories with my little girl.
Wednesday, March 30, 2011
So many new rocks!
At the beginning of this month, my entire family was hit with the worst flu bug I have ever experienced. It's been 4 weeks, and I'm still recovering. During this time, I was not feeling up to cutting, but I was up for shopping! The internet provides many wonders, including the ability to shop in pajamas. We ended up with tons of new rough rock, and I'm so excited to be back to work, cutting away!
One new material for us this month is Purple Kingman Turquoise and Bronze. We have carried the blue for quite a while, but the first purple cabs were listed on etsy just a few hours ago. This material is dyed, stabilized, and bronzed in Arizona.

Another new material I am completely in love with is our Chatoyant Malachite. Who ever thought malachite could get better? Not only does this stone have the classic, stunning malachite color, but it also features a glowing, feathery effect. Gorgeous!

And anyone that knows me knows how much a crave working with Chrysocolla. I've going Chrysocolla Crazy, cutting
Gem Silica:

Ray Mine Chrysocolla:

Sonoran Sunset:

And a few more varieties, check our etsy shop for all the beautiful blues!
And one more I have to mention in the Cherry Creek Jasper, also known as Red River Jasper. This has been a stone I have always wanted to work with. I have tried in the past, and failed when it came to the polishing process. This time I got it right! I was lucky enough to start with an incredible quality chunk of the material, and it polished up beautifully! I couldn't be happier with these stones.

So I guess there is even a silver lining in being sick, I can't wait to dig deeper into my pile of goodies and get back to cutting!
Sunday, March 6, 2011
Custom Work

Photo of a Laguna Agate Cabochon
I originally started cutting stones for my own jewelry designs. I could never find exactly what I wanted when shopping for cabochons. It seemed to me cutting stones would be a simple job with not much to it. Boy was I wrong! Pretty soon I found myself using all of my time trying to perfect my stone cutting, and I didn’t have any time left for creating jewelry designs.
It didn’t take me much longer to realize I enjoy cutting the stones more than I ever enjoyed creating jewelry. Now that’s really all I do, and my FAVORITE part is seeing what other artists create with my stones.
It’s because of all of this that I also really enjoy custom work. I offer two different custom work services. The first is for when you may see a stone in my shop, but it’s not quite the correct size or shape. I almost always set aside rough of every material for custom work. If you find yourself in this situation, you’re more than welcome to send me a convo! At this point I will cut the stone and send you photos for approval once it’s done. You are never obligated to any stone! If you’re not happy, I can try again.
The second type of custom work I do is from your personal rock collection. Maybe you have a stone you’ve held onto since you were a kid, or maybe you just picked up a slab at a gem show. You can send your rough stone to me along with a sketch of how you would like it cut, and I will cut it for you. We charge a flat fee per cabochon and you can convo me through etsy for more details.
The custom work I have done in the past has always been so exciting for me. There is something special about being included in an artists vision!
Monday, January 24, 2011
Gems on Etsy: How to Cut a Rock
Gems on Etsy: How to Cut a Rock: " I did this post last year on a jewelry making forum,I figured I would post it here on my blog for anyone interested. I start w..."
Saturday, January 8, 2011
Win a $50 gift certificate to Cabbing Rough!

Flickr Contest
Leopardskin Jasper pendant made by Pennee. You an find this pendant in her etsy shop All Wired Up
When I first started cutting cabochons, they were either for my jewelry creations or for people I knew personally. I was always very excited to cut a stone for someone else because their finished pieces would always be so different from what I imagined when I cut the stone. Since we’ve started selling on etsy, there have been so many stones I wonder about what they have turned into.
So a few months ago we started a contest to encourage artist’s to share their jewelry designs with us. Here’s how it works:
1.) Make something out of a stone you purchase from Cabbing Rough
2.) Upload a photo of it to www.flickr.com/groups/cabbingrough You may enter as many pieces as you like.
3.) At the end of the month, each member of my family gets a vote, even my 3 year old son! The photo with the most votes gets a $50 gift certificate to our etsy shop.
4.) This contest runs EVERY MONTH, so make sure you stop back often!
Although I didn’t think of this originally, this contest page has been a great resource for me. Many times I receive emails from customers wanting one of or stones made into a finished piece of jewelry. I now refer them to this flickr page to browse! So if you enter, make sure you have a link to your online store under your flickr profile, not on your photo (against flickr rules)
Flickr Contest
Friday, January 7, 2011
Mooka Jasper (mookaite)

Mookaite is a stone I have worked with quite a bit. I really love cutting this stone because of the possibilities. The shades and patterns can vary so much, and sometimes the patterns create pretty scenes or eyes.
Mookaite is also known as Mookite, Mookalite, Mooka Jasper, or Mookarite. It is found in Western Australia. The Aboriginal word "mooka" means "running waters". It is made up of chert, opalite, and chalcedony.
Subscribe to:
Posts (Atom)